
So in the last four posts we learned how to write InSpec controls. It was supposed to get you started, and then you could continue as far into the workshop as you wished.
- Day 1: Hello World
- Day 2: Command Resource
- Day 3: File Resource
- Day 4: Custom Matchers
Full disclosure, I haven’t finished the workshop, but I’m chipping away at it. I’ve gotten enough done, though, that I wanted to see if I could create a profile out of it, just because I was eager to give it a go.
Let’s say your company needs a whole profile of controls that are not offered by Chef Compliance, and you need to run them on various machines. First you would make all of those controls (or pay me to do it for you). But now how are we going to let other people use it? You’re dying to know, I know.
Y’all…
Today’s an exciting day. The very hard-working Christoph Hartmann was kind enough to meet with me and teach me how to build a profile out of all of my InSpec controls!
I gotta say…it’s so easy. Like so easy that he described it and I understood it without asking questions, and I wasn’t bluffing, either.
Ingredients
We don’t need much to get this one done!
- your text editor
- your command line
How to do it
- Connect to GitHub
- Run the profile command
- Clean up our folders
- Edit .yml file
- Check your profile
- Push it to git
- Run it
1. Connect to GitHub
Do you remember at the end of my posts when I said that you should really share this on GitHub? Well, I really hope you did, because you’ll need to have a git repository connected to GitHub for the magic to happen. Here’s mine if you want to fork it.
Once you have the repository cloned to your machine, you’ll need to navigate to the parent directory of your workshop.
2. Run the profile command
When you’re in the folder that encloses your workshop, run this, and it will create those files I told you about.
inspec init profile inspec-workshop --overwrite

3. Clean up our folders
Go back to your text editor, and take a look at what you just did.
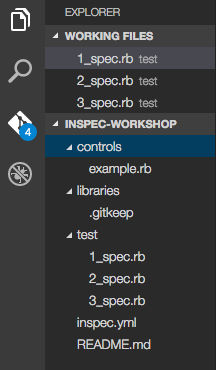
Your old folder is in there; mine’s called test. And there’s a .yml, libraries folder, and a controls folder.
Do you notice how there’s an example.rb file in the controls folder? That tells us two things:
- We need to move our tests into the
controlsfolder, so let’s do that now.
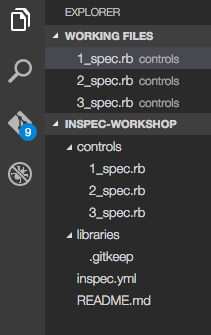
- We don’t need the _spec on our file names anymore. Christoph told me today that we needed it for previous versions, but they’ve since done away with that requirement. So go ahead and edit those, if you wish; I did.
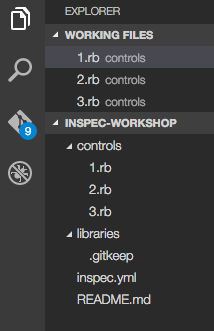
- I also deleted my test folder and example.rb to clean it up.
4. Edit .yml file
Now let’s head over to your newly created inspec.yml and add all of your information on it.

5. Check your profile
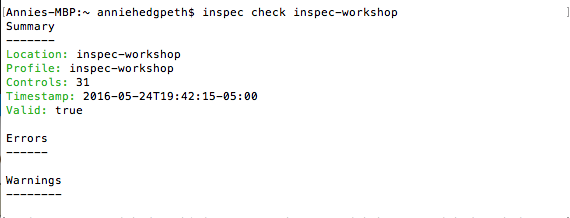
Let’s go run a check to see if it’s really a valid profile now and if it has any errors or warnings.
inspec check inspec-workshop
The first time around I got a warning because I had a typo.
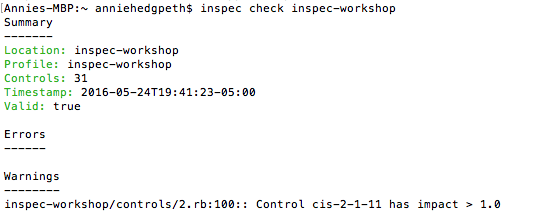
So I corrected it, and I was good to go!
6. Push it to git
Let’s now push it to GitHub.
7. Run it
We don’t even know if it really works yet, right? Well, go to your browser, navigate to your repo, and copy the url to your clipboard.
Now we’re going to run inspec exec straight from our git repo now instead of running it locally off of the file!

inspec exec https://github/YOURNAME/inspec-workshop -t ssh://USERNAME@IPADDRESS --password 'PASSWORD' --sudo-password=PASSWORD --sudo
How cool is that? You’re done! It is seriously that simple.
Concluding Thoughts
After all of that, you’ll surely want to upload it to Chef Compliance for simplicity’s sake, and guess what? Next time we’re doing it! I would have been able to tell you how to do it today, because it’s another really simple process, but when Christoph was explaining it to me my kid kept coming in the room and asking me to spell things, so I was a bit distracted.
I hear also that building your profile and putting it on GitHub is a way that you can use it as a test kitchen verifier, but I don’t even know what that means yet, so when I learn you’ll surely know about it.
Go to Day 6: Ways to Run It and Places to Store It